As a simple definition, we can say that an Active Server Page is a mix of a Markup Language (HTML or WML), scripts (VBScript or JavaScript) and ASP code that allows us to create a dynamic and database-driven WEB or WAP applications. ASP pages are interpreted by the server and the information returned to the browser has a form that this last one can understand (HTML or WML). ASP pages should be stored in the root directory of the web server, it is by default "\inetpub\wwwroot" and they should be asked from it with an HTTP request using something like : "http://localhost/file.asp", so using a URL like "file://C:/inetpub/wwwroot/file.asp" will not work (There is information about the server installation in the tools page, aslo about the MIME types settings you must add to run your ASP files). |
Now we can have a look at a very basic asp file to introduce you for the more advanced ones that I'm using in the application.
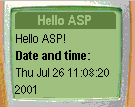
Save this code as "first.asp" file in "C:\inetpub\wwwroot" and after that, run it in your simulator using the HTTP request: "http://localhost/first.asp" You should see something like in Figure1 bellow:
The first thing to start our ASP file with is to declare the script language we are going to use. The default one is VBScript but we are using here JScript. Because We are going to use this ASP to genrate a WML file, so we shoud set the MIME type that the server must return to "text/vnd.wap.wml" (the default one is "text/html"), this is done using the ContentType property of the ASP's Response object. As we can see, this is not so different than a normal WML deck, what is added is just some snippets of code delimeted between the <% and %> signs. In the body of the card, we used again the Response object but this time it was its write( ) method which has done the job for us, it writes the date and the time to the browser using the Date( ) function. Before starting the discussion about our application's files again, I should tell a little about the most interesting things in ASP: its built-in objects. The Response object we saw before was one of them. I'm not going to tell about them all, but I'll try to explain the ones I used in the application: ♦ Response Object used to send information, like HTTP variables, back to the browser ♦ Server Object allows us to access and use the properties and methods of the server ♦ Request Object makes available the values that the browser passes to the server during an HTTP request |
This is the third file in the application, it seems to be relatively long one, but it's not so complicated :)
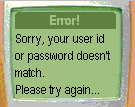
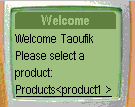
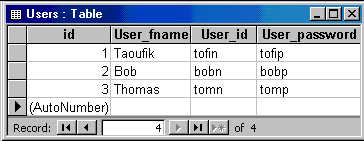
This file will be excuted after selecting the submit link in the Login card we saw at the start of the application. But first you should move all those files needed to your web root directory "C:\inetpub\wwwroot" (You can download all files including database file and the logo picture from the tools page where you can find also explanation of the database file) and with an HTTP request run the "storelogo.wml" which will bring you to the Login card. If you give some hazardous inputs for the user id and the password you should get the card in Figure2. If you give inputs from the users table in our database shown in Figure5 you will get something like what's in Figure3.
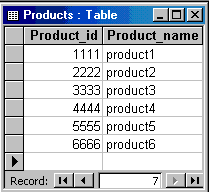
ADO objects should be first created and stored in variables, then we can use them, that what happened in our file: we created the Connection and the RecordSet objects using the ASP Server object's CreateObject( ) method, after that we used them. We opened the connection to our Microsoft Access storedb.mdb file using the string in the Connection's Open( ) method in this way: conn.Open ("DRIVER={Microsoft Access Driver (*.mdb)};DBQ=filename.mdb;"); And we opened the RecorSet using its Open( ) method also, which took two parameters: the query UserQry and the connection conn. The UserQry holds a -SELECT...WHERE- SQL (Structered Query Language) statement, which compares the user id and the password given by the user with the records in our Users table. By an if ... else statement, we separate between the tow cases: 1. Our RecordSet is already at the End Of File (EOF), that means that there is no record found corresponding to the user's inputs, then we suply the card titled Error! (Figure2) and we close the Connection object with its Close( ) method, this will close also the RecordSet object. 2. The inputs are corresponding to a record in the Users table, then the RecordSet object is not empty and the second card titled Welcome will show up (Figure3). This card has quite much content, the first thing dispalyed from the table is the user's first name which we got by a reference to the RecordSet object: (<%=rs("User_fname")> this is just a short-cut for <% Response.Write(rs("User_fname"))>), after this we open a new RecordSet prodRs which will hold all the records from our Products table:
Next, we allow the user to give the rest of data we need from him (number of units, date when it's needed), we added here the "format" attribute for the <input> tag to make it easier to give inputs, in the first one we set it to "*N", that means that the user can give any number of units she/he wants, in the second one we set some fixed characters by preceding them with "\" and we allow entering just numbers for the date. Finally and as we have done at the end of "storelogin.wml" we collect all the data and we send it to the server with the request for the last file in our application order.asp which we will discuss next. A cancel link was added to cancel everything and return back to the login deck if needed. |
This is the last file in our application, so it will do the rest of the job for us, which means that it is the responsible for storing the order information in the system's database.
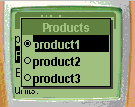
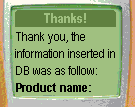
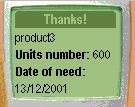
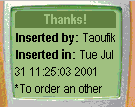
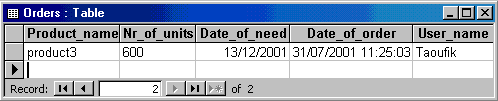
After choosing the product (Figure4) and filling in the number of units and the date, the user send all these data with the request for our last file by selcting the Confirm link. When this one is excuted in the server, the response will be sent back and it will show up in the simulator somehow like we see in the Fiugres6,7and8 (These figures are representing just one card, I just scrolled it down to show all its content). And the order's data will be stored effectively in the database as Figure9 proves.
Because we used the default method to send data from store.asp, so we get it using the Request's QueryString( ) method. After that we open the connection in the same way we did last time and we give the query we need using the SQL's INSERT INTO... statement which we excute this time by the help of the Connection's Excute( ) method. (you can see that we added also the date of the order (Now( )) and the user name (sendername) in the SQL query) Finally, we gave the user the opportunity to see his data which have been sent and we are done. (It's very possible to give the user the advantage of being able to delete those data if she/he notice a mistake, or replace them with something else... I leave this task to who likes maybe to improve this application in this way). |